
In a Teacher workshop this week we were looking at ways of following a line. In these workshops I stick with a simple ‘wiggle’ algorithm just using a Switch statement and some Move Blocks. The group picked it up quickly and we had a little bit of time left at the end, so naturally the question arose, “How do we make it stop at the end?”
I took them through a few easy implementations, but when I got home, it occurred to me that we had a similar conversation on the mailing list last year – full discussion here
There were quite a few great solutions and ideas put forward (thanks Esther, Ian, Randall, Elwood, Amy and Jon) and I thought it might be useful to turn those ideas into actual code so teachers could get a better idea of how each worked.
Simple Line Following (No Stop)
Using the very basic line following program shown below, the robot will turn left to see the line and then right to avoid the line. Repeat this forever and the robot will ‘wiggle’ its way down the line.
However, using this program, the robot only ever know ‘line’ or ‘no line’. Once you get to the end of the line, the robot is in the ‘no line’ branch of the Switch Statement and will continue to turn until it is back detecting the ‘line’. We need some way of recognising that we are at the end of the line, without just mistaking it for coming off the line.
These are suggestions that were put forward, and I’ve quickly written the code to make it happen.
Time based (Ian)
The loop runs for a set amount of time. This may take a little trial and error to work, and can be a bit variable depending on the robot.

Distance Based (Ian)
By keeping track of how far one wheel has turned, you can also have a good idea of when you need to stop. Again it can be a bit hit-and-miss, but should get you close. This example stops once the B motor goes over 4000 degrees (about 11 rotations).

Obstacle based (Randall, Me)
You could place an obstacle at the end of the line ie. a box or large book. The loop then continues to run until the robot ‘sees’ the obstacle. This could be done with the Touch Sensor (make sure it is set to ‘pushed’ , not ‘bumped’) or the Ultrasonic Sensor.


Additional Line marker (Me, Jon, Amy)
You could place a strip of colour, that is different to the line or table, at the end of the line. An example that I use all the time is some kitchen foil taped down. This gives a very high reading from the Light Sensor and can be used to break out of the Loop. Amy pointed out that if you are using 2 Light Sensors (with an appropriate algorithm), you can create a ‘T’ intersection using the same colour as the line horizontally at the end. If both sensors see the black at the same time, then you know you’re at the end.

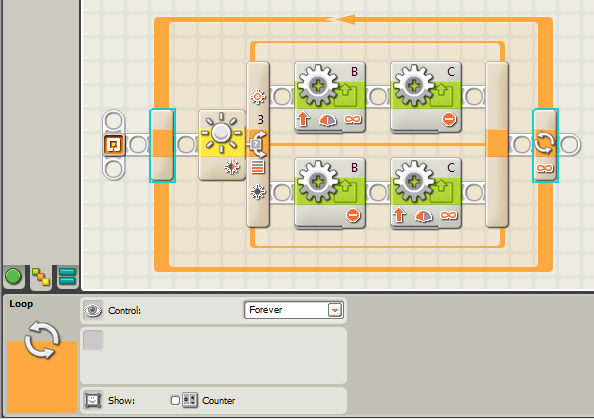
Measure Turns (Elwood)
This is a little more complex, but very effective. Not only will it detect the end of the line, it will also stop if the robot comes off the line anywhere along the course. It relies on the nature of the ‘wiggle’ line following algorithm. If you have a good idea of how much ‘wiggle’ your robot needs to do to stay on the line, then if the robot appears to be doing to big a ‘wiggle’ then there is a good chance you’re at the end or that your robot has lost the line. ie. If you know that for a given line following algorithm, your B Motor turns at most about 100 degrees, then if the B motor has turned 300 degrees, chance are that you’ve missed the line.
 (image by Elwood Fischer)
Elwood also shows us a neat little way to turn back roughly the way the line was, by turning that motor back half the turn that occured when it came off.
 (image by Elwood Fischer)
Do you have another way of achieving the same result, let us know in the comments?
Hi, Im a student working for a project and wanted to ask a simple question. I want it to stop and the end of the line and search for something and pick it up… Any way I can achieve this without interfering with the walls for example? Thanks
Joesph, I'm not sure what you're asking here? Elwood's loop stops when it reaches the end of the line, and you can just continue on blocks after the loop to make your robot go to another place.
How i can stop the loop in Elwood's program, when I want to go elsewhere? Thank you.
Well spotted CPJ. This method should have "C unlimited, B stopped" and "B unlimited, C stopped". We all quickly through together our suggestions in response to the mailing list question, so some of the solutions didn't get as thorough checking as they should have! 🙂
Question about the Measure turn(Elwood). What happen when the C motor does not see the black line? The robot will start turn in a circle. The loop will never read the B rotation.
You can download the building instructions here!
http://www.damienkee.com/home/2011/8/20/domabot-classroom-robot-design.html
I believe you should have strict instructions while building the Damienkee robot instead of just looking at a picture.